Creating your first Xamarin.Android App
You can use either Visual Studio for Windows or for Mac for creating a new Xamarin.Android app.
Create new project
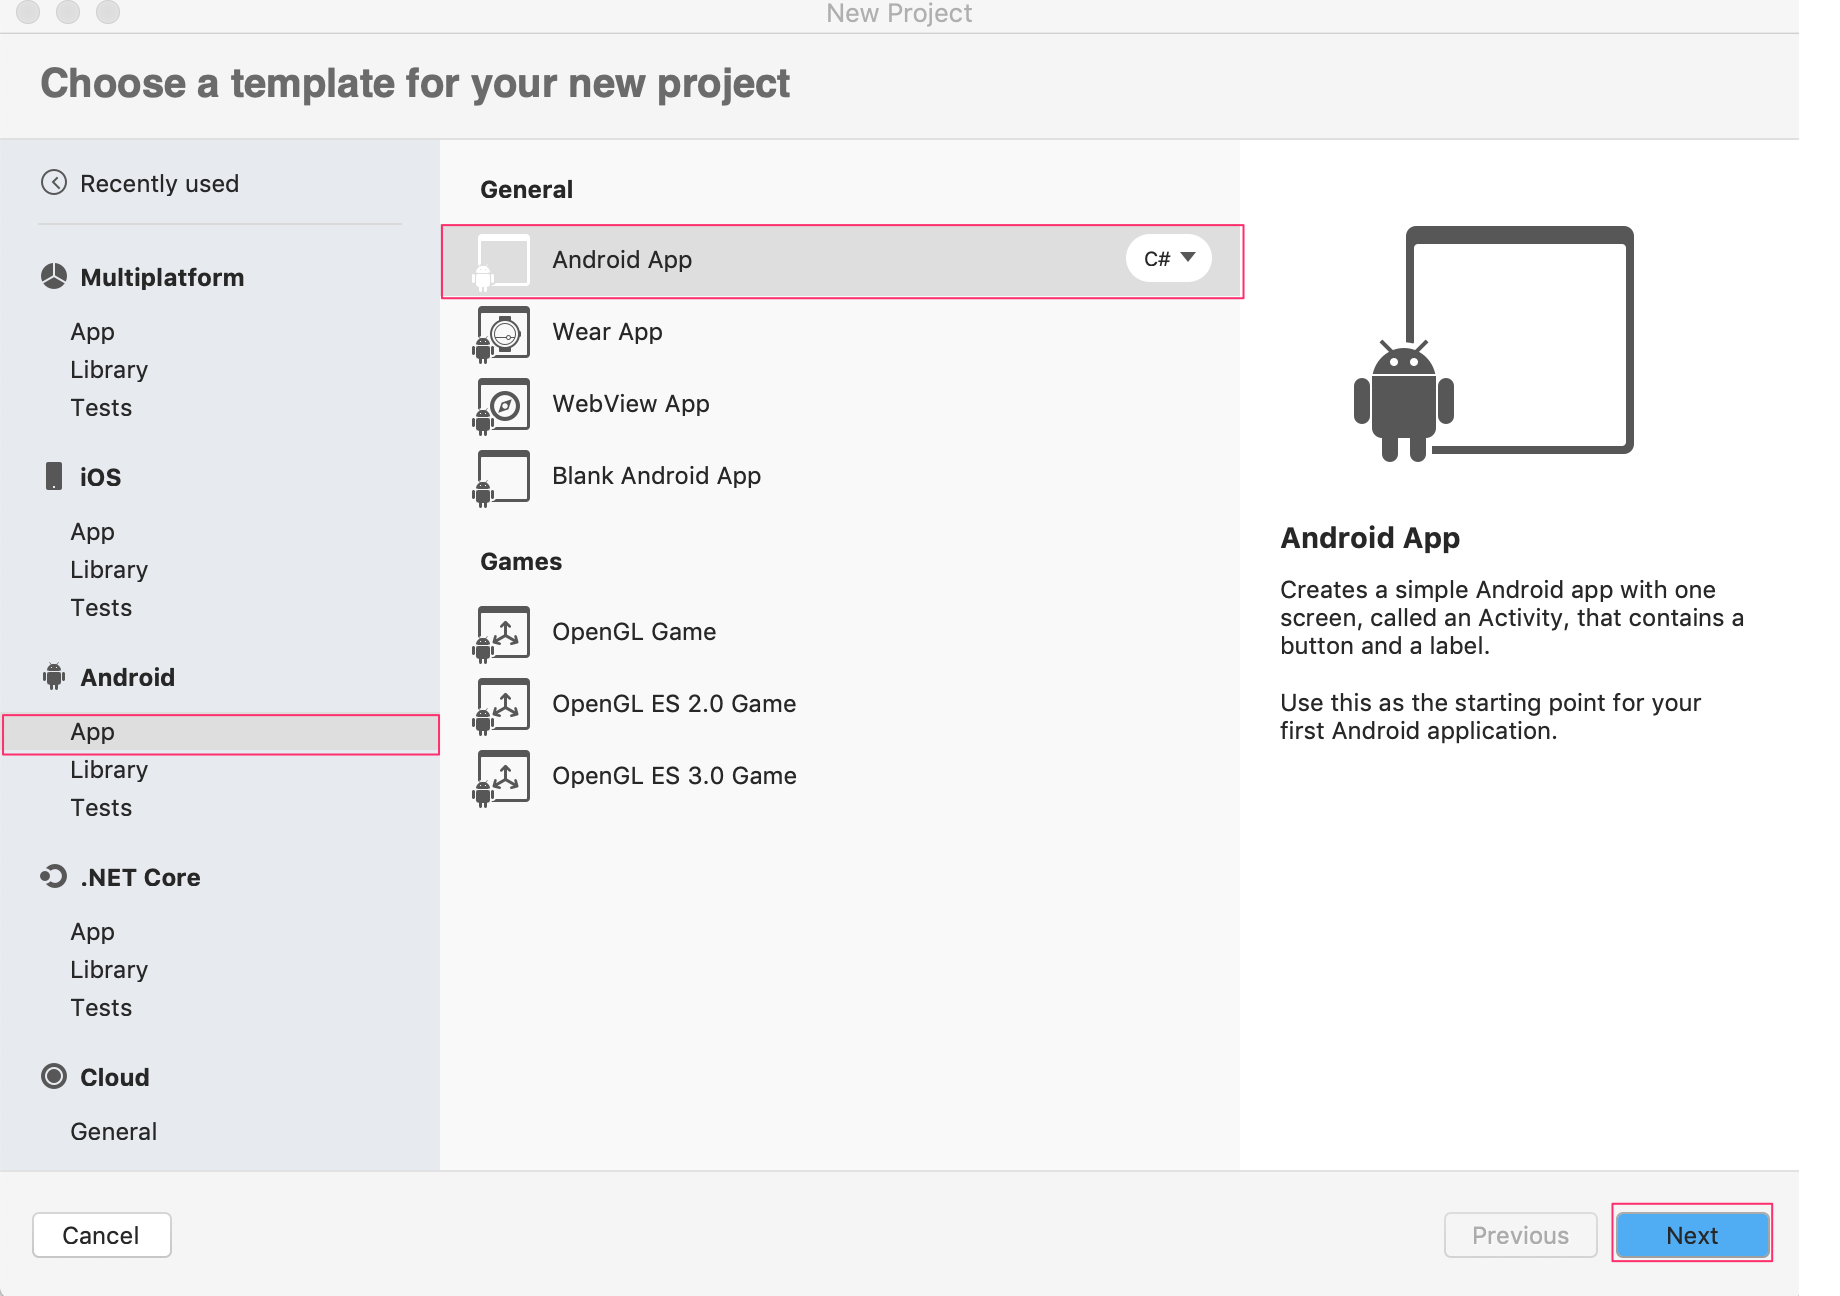
- Open Visual Studio
- Choose File -> New Solution
- Choose Android -> Android app
Configure the project
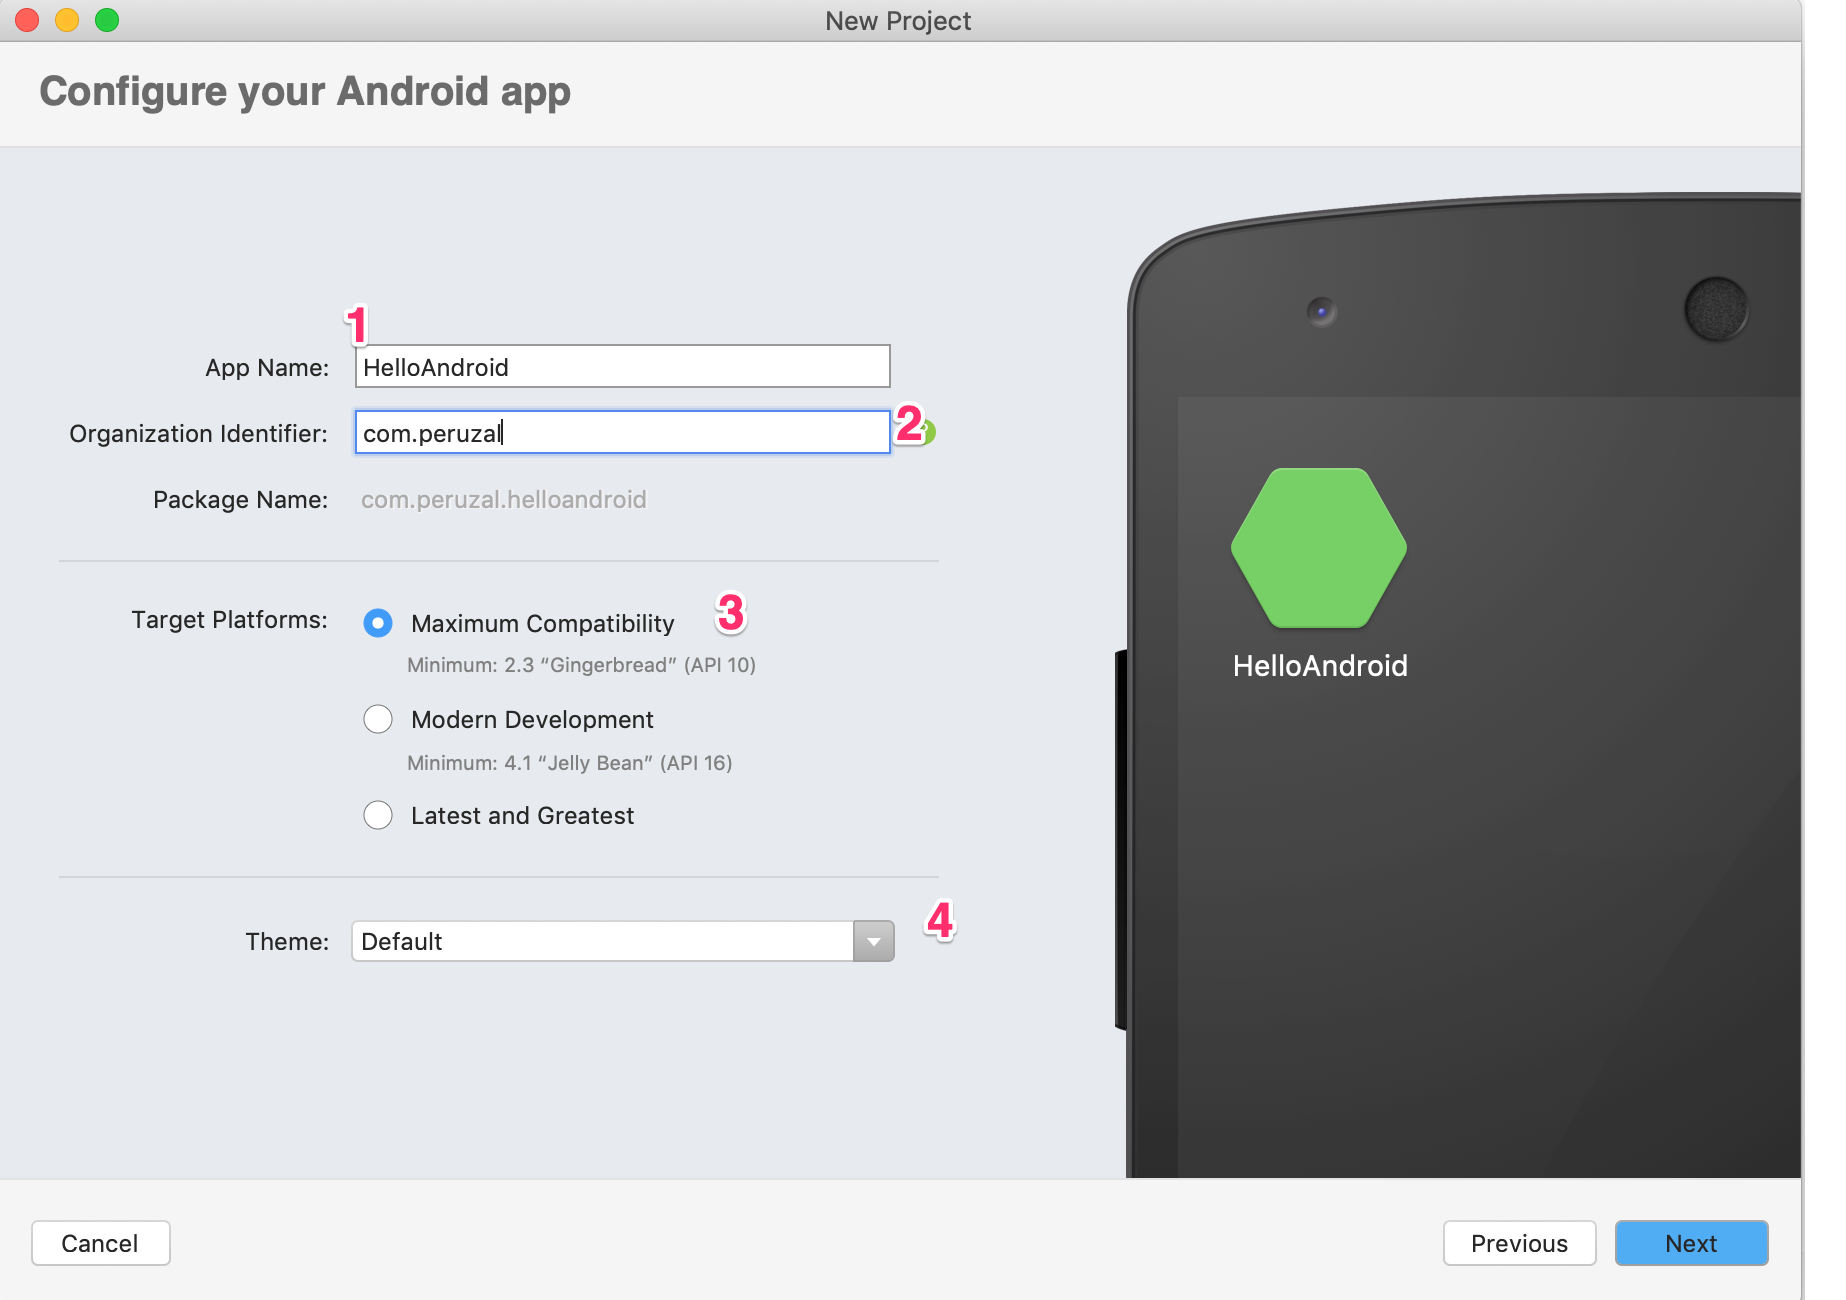
- App Name - This is the name of the app.
- Organization identifier - This is the unique name used together with the app name to uniquely identify your app on the Google Play Store.
- Target platforms - This is the platforms on which the app can run, its always advisable to choose the version of the Android that can support at least 90% of the devices in the wild.
- Theme - The default theme that will be applied to the entire app. This can be changed and configured later.
Organization Identifier
The convention is to use the reverse of the domain name since its guaranteed to be unique.
Android Versions
Google maintains a list with statistics on the different versions of Android currently installed on Google Android Dashboard
Project Structure
A Xamarin.Android project have the following structure :
1 2 3 4 5 6 7 8 9 10 11 12 13 14 15 16 17 18 19 20 21 22 23 24 25 26 27 28 29 30 31 32 33 34 35 36 37 38 39 40 41 42 43 44 45 46 47 48 49 50 51 52 | . ├─ References │ ├─ Mono.Android # Mono.Android library reference │ ├─ System # Reference to System library │ ├─ Systen.Core │ ├─ ... │ └─ System.Xml ├─ Packages │ ├─ Xamarin.Android.Support.Core.Utils # Support libraries │ ├─ Xamarin.Android.Support.CustomTabs # Support libraries │ ├─ Xamarin.Android.Support.Design # Material Design Support library │ └─ Xamarin.Essentials # Xamarin Essentials library ├─ Assets │ └─ AboutAssets.txt # Add raw assets here ├─ Properties │ ├─ AndroidManifest.xml # Glues the app to Android system │ └─ AssemblyInfo.cs # Global assembly ├─ Resources │ ├─ drawable # Contains images │ ├─ layout # contains layout files │ │ ├─ actvity_main.axml # Layout file │ │ └─ content_main.axml # Layout file │ ├─ menu # Contains menu resource files │ │ └─ menu_main.xml # Menu resource file │ ├─ mipmap-hdpi # App icons shown on hdpi density │ │ ├─ ic_launcher.png │ │ ├─ ic_launcher_foreground.png │ │ └─ ic_launcher_round.png │ ├─ mipmap-mdpi # App icons shown on mdpi density │ │ ├─ ic_launcher.png │ │ ├─ ic_launcher_foreground.png │ │ └─ ic_launcher_round.png │ ├─ mipmap-xhdpi # App icons shown on xhpi density │ │ ├─ ic_launcher.png │ │ ├─ ic_launcher_foreground.png │ │ └─ ic_launcher_round.png │ ├─ mipmap-xxhdpi # App icons shown on xxhdpi density │ │ ├─ ic_launcher.png │ │ ├─ ic_launcher_foreground.png │ │ └─ ic_launcher_round.png │ ├─ mipmap-xxxhdpi # App icons shown on xxxhdpi density │ │ ├─ ic_launcher.png │ │ ├─ ic_launcher_foreground.png │ │ └─ ic_launcher_round.png │ ├─ values # Contains internationalized resources │ │ ├─ colors.xml # Contains the color resources │ │ ├─ dimens.xml # Contains the dimensions │ │ ├─ ic_launcher_background.xml │ │ ├─ strings.xml # Contains string resources in English │ │ └─ styles.xml # Contains style definitions │ └─ Resource.designer.cs # Auto generated designer file └─ MainActivity.cs # Default start Activity |
Android Components
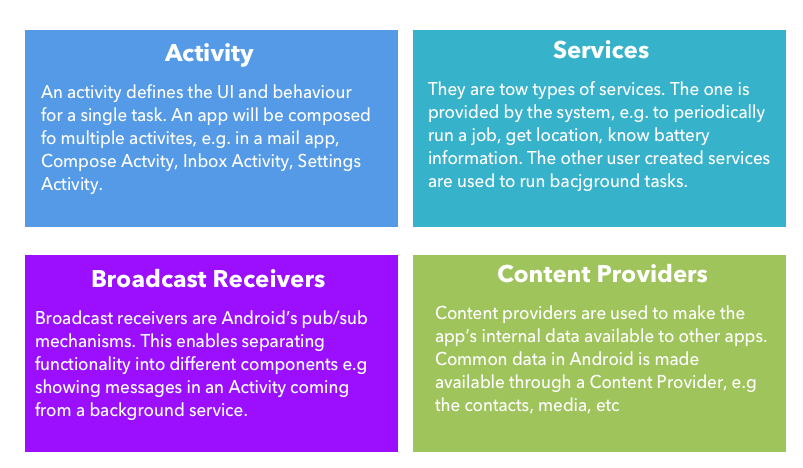
An an Android app is composed several components :
- Activity
- Services
- Broadcast Receivers
- Content Providers
Each component provides a specific functionality and they are tied together using Intents. Intents are used to pass messages across the different components of Android.
Creating an Android Device Emulator
Emulators allow you to test your Android apps without using a physical device.
Note
Android emulators allow you to test your apps against different versions and devices of Android.
Creating an Emulator
- Click Tools ->
- Click New Device
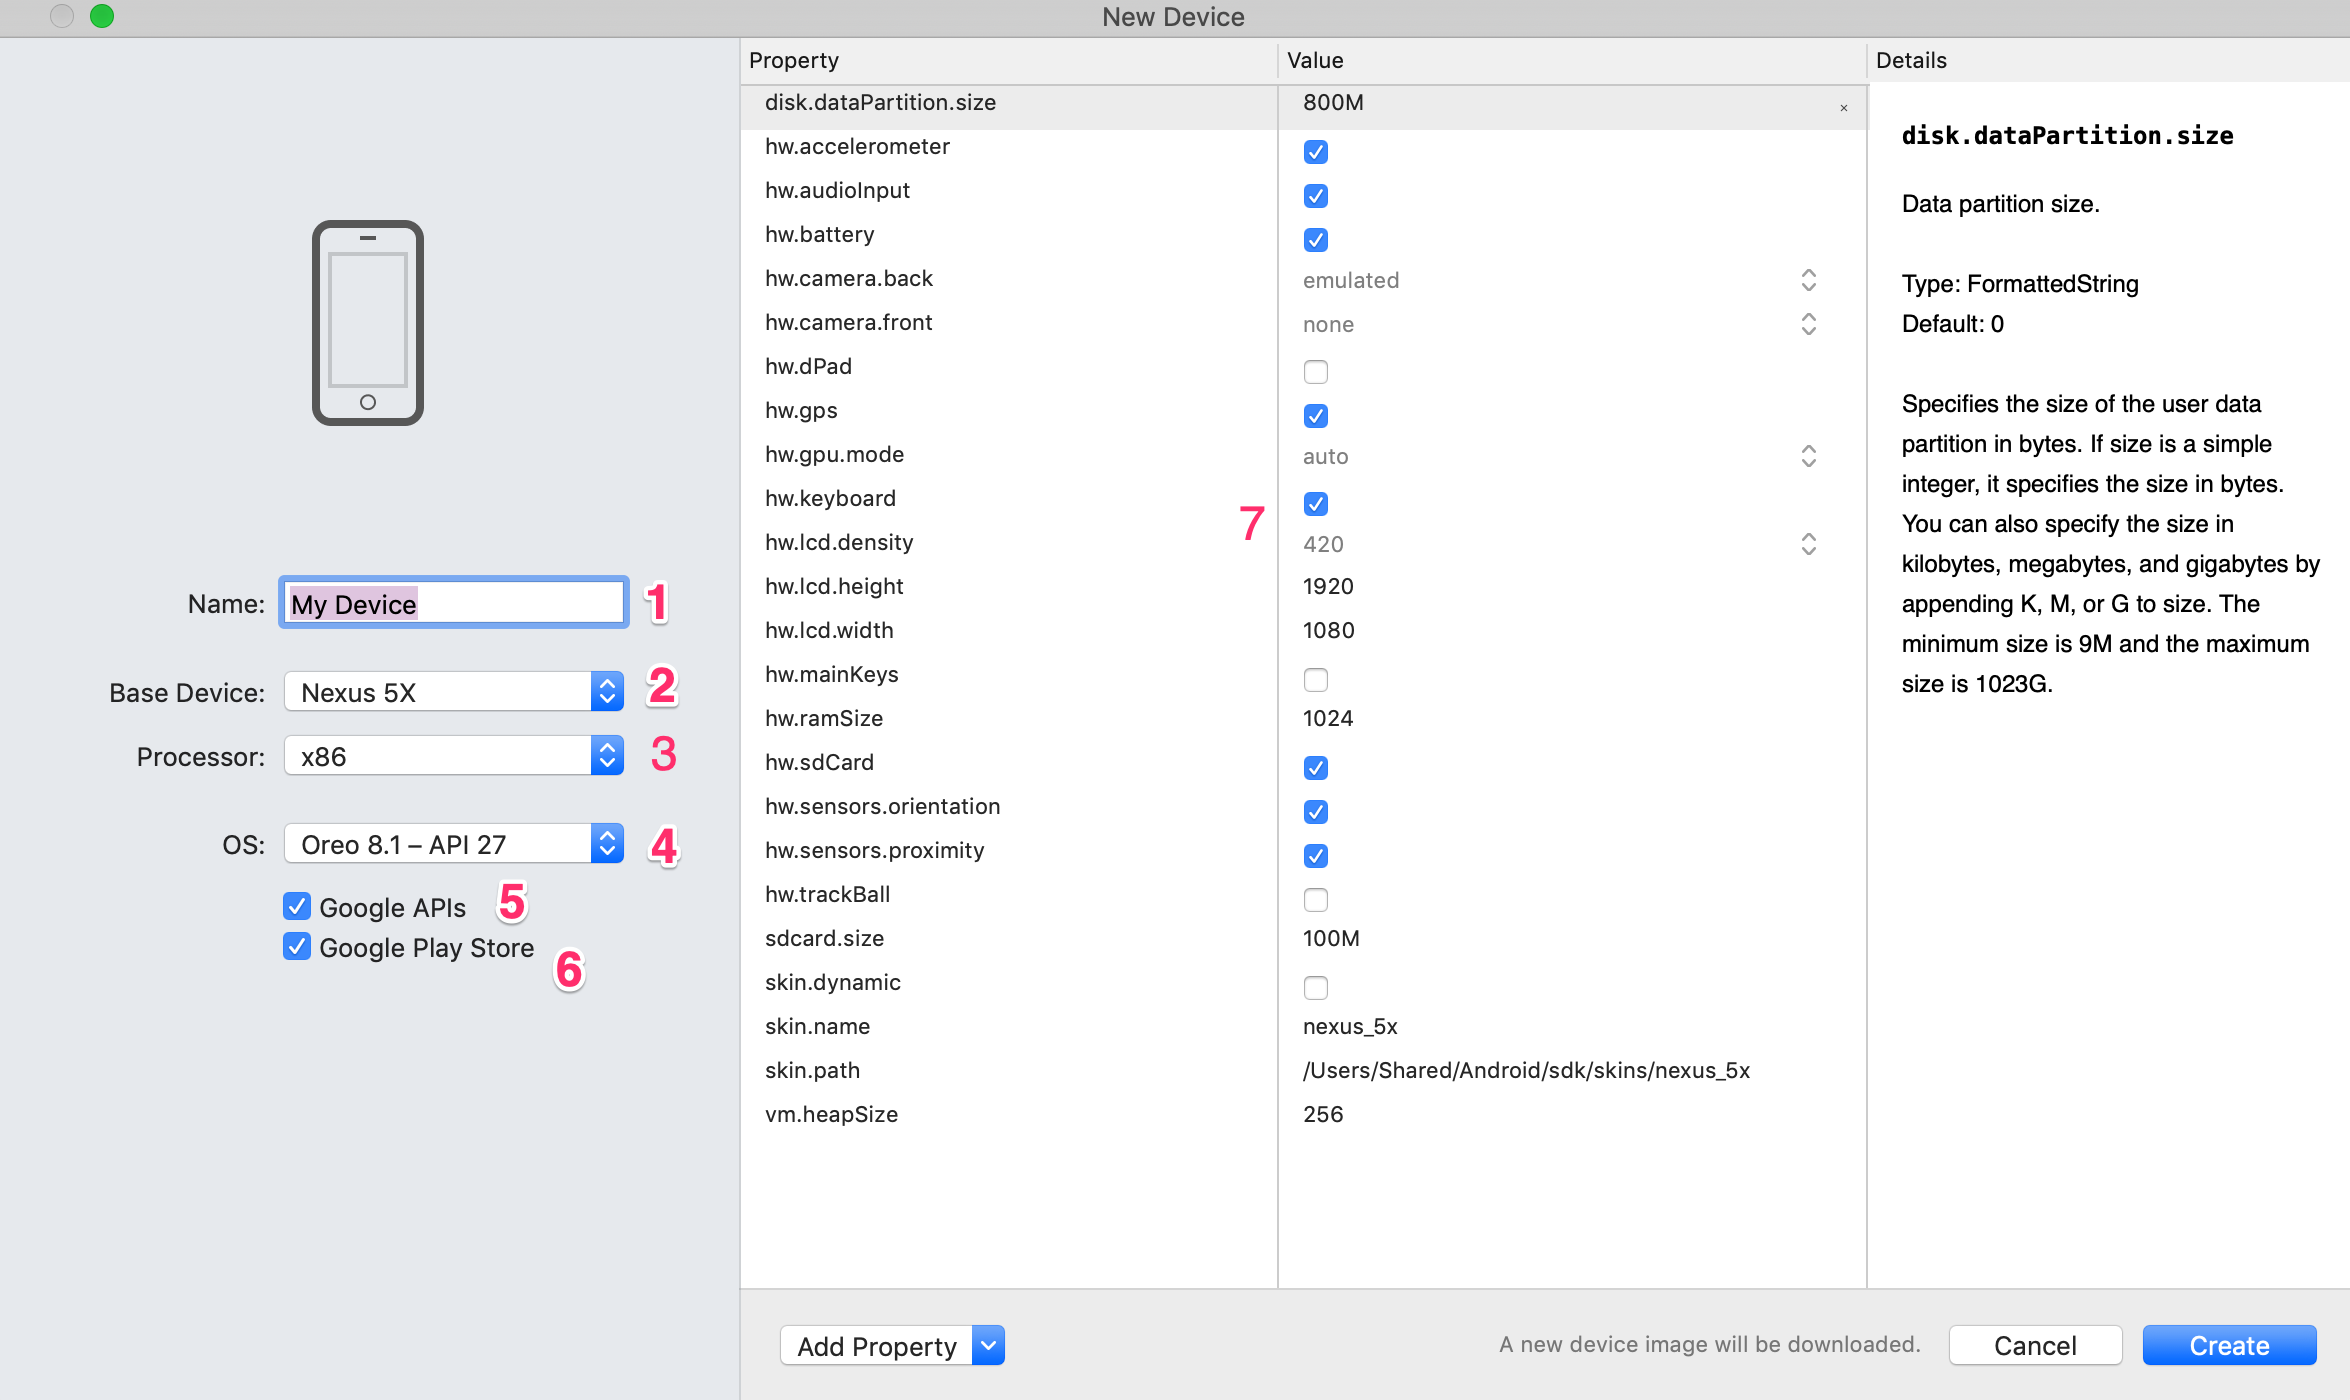
- Name - The name of the emulator device. You can create many emulator devices.
- Base Device - The device mode, e.g Nexus, watch tv or a generic device.
- Processor - The type of the processor. For speed we use the x86. Physical android devices runs the ARM processor.
- OS - The version of Android
- Google APIs - Install the Google APIs on the device. This is required to install the Google Play Store.
- Google Play Store - Get an emulator with the Google Play Store installed. The enables you to install additional apps on the emulator.
- Properties - These are the properties available on the device. You can add more properties by choosing Add Property.
Downloading System Image
If you the version of Android you choose is not yet installed, the wizard will start the download. Make sure you have a fast active internet connection. Most of the images are more than 500Mb, it might take a while on a slow connection.
Starting the Emulator

Once the emulator is downloaded and created, you can now start it.
- You can click the Play icon to run project. When there are no emulators running, Visual Studio will start the emulator.
- You can also go to the Device Manager, Tools -> Device Manager. When loaded, click Play
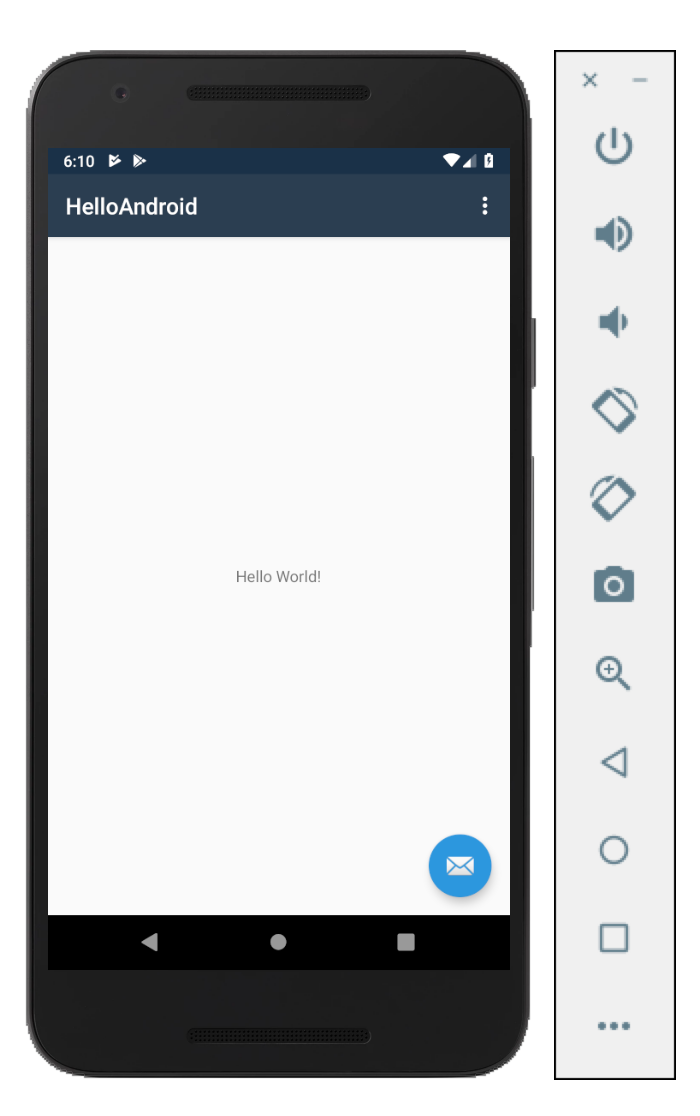
Running the emulator
Its recommended to start the emulator once and continue deploying your apps as the emulator can take long to start.
Android emulator running
After starting and deploying the HelloAndroid, you will now get the app installed and running on the emulator.
Exploring the default MainActivity
The default Android project template creates one MainActivity.cs file. An activity contains the the C# code and the UI layout file.
1 2 3 4 5 6 7 8 9 10 11 12 13 14 15 16 17 18 19 20 21 22 23 24 25 26 27 28 29 30 31 32 33 34 35 36 37 38 39 40 41 42 43 44 45 46 47 48 49 50 51 52 53 54 55 56 57 58 59 | using System; using Android.App; using Android.OS; using Android.Runtime; using Android.Support.Design.Widget; using Android.Support.V7.App; using Android.Views; using Android.Widget; namespace HelloAndroid { [Activity(Label = "@string/app_name", Theme = "@style/AppTheme.NoActionBar", MainLauncher = true)] public class MainActivity : AppCompatActivity { protected override void OnCreate(Bundle savedInstanceState) { base.OnCreate(savedInstanceState); Xamarin.Essentials.Platform.Init(this, savedInstanceState); SetContentView(Resource.Layout.activity_main); Android.Support.V7.Widget.Toolbar toolbar = FindViewById<Android.Support.V7.Widget.Toolbar>(Resource.Id.toolbar); SetSupportActionBar(toolbar); FloatingActionButton fab = FindViewById<FloatingActionButton>(Resource.Id.fab); fab.Click += FabOnClick; } public override bool OnCreateOptionsMenu(IMenu menu) { MenuInflater.Inflate(Resource.Menu.menu_main, menu); return true; } public override bool OnOptionsItemSelected(IMenuItem item) { int id = item.ItemId; if (id == Resource.Id.action_settings) { return true; } return base.OnOptionsItemSelected(item); } private void FabOnClick(object sender, EventArgs eventArgs) { View view = (View)sender; Snackbar.Make(view, "Replace with your own action", Snackbar.LengthLong) .SetAction("Action", (Android.Views.View.IOnClickListener)null).Show(); } public override void OnRequestPermissionsResult(int requestCode, string[] permissions, [GeneratedEnum] Android.Content.PM.Permission[] grantResults) { Xamarin.Essentials.Platform.OnRequestPermissionsResult(requestCode, permissions, grantResults); base.OnRequestPermissionsResult(requestCode, permissions, grantResults); } } } |
Using statements
At the top of the activity is several declarations of the namespaces used by the activity.
1 2 3 4 5 6 7 8 | using System; // System namespace using Android.App; using Android.OS; using Android.Runtime; using Android.Support.Design.Widget; // Material design views using Android.Support.V7.App; // The AppCompatAcitivity is declared in this namespace using Android.Views; // Namespace containing Android views using Android.Widget; // Provides common Android views e.g Button |
Activity attribute
The [Activity()] attribute is used to mark as class as an Android activity and generate the appropriate xml metadata in the AndroidManifest.xml file. The class will also need to inherit from Activity or AppAcompatActivity.
Label = "@string/app_name"** - Define the name of the app shown on the launch screen or title barTheme = "@style/AppTheme.NoActionBar"- The Theme used by this activityMainLauncher = true- Defines this activity as the launcher Activity. The entry point into the app
The line [Activity(Label = "@string/app_name", Theme = "@style/AppTheme.NoActionBar", MainLauncher = true)] will generate the following in the AndroidManifest.xml file :
1 2 3 4 5 6 | <activity android:label="@string/app_name" android:theme="@style/AppTheme.NoActionBar" android:name="md57bb84b1b6def9d8d059b80af1b562686.MainActivity"> <intent-filter> <action android:name="android.intent.action.MAIN" /> <category android:name="android.intent.category.LAUNCHER" /> </intent-filter> </activity> |
AndroidManifest.xml generated attributes
Notice how the generated attributes correspond from the [Activity()], the Label matches the android:label and the Theme matches android:theme and the MainLauncher is defined inside the intent-filter under <category android:name="android.intent.category.LAUNCHER" />
What is the difference between Activity and AppCompatActivity
The AppCompatActivity provides backward compatibility with older versions of Android, whilst the Activity only supports the version targeted by the current Android SDK used during development. Its always recommended to use AppCompatActivity.
Defining the Activity
An Android Activity is a class that inherits from the Activity or AppCompatActivity. The Android ActivityManager starts an Activity. The Activity will need to be registered in the AndroidManifest.xml file.
1 2 3 4 | // Defines an Activity called MainActivity public class MainActivity : AppCompatActivity { .... } |
Connecting the UI to the Activity
The UI for the activity is defined using XML. In Xamarin.Android the file extension of the layout file ends in .axml.
The activity makes the connection to the layout file in the OnCreate life cycle method. The SetContentView method takes in the layout id and connects it to the activity.
1 2 3 4 5 6 7 8 9 10 11 12 | protected override void OnCreate(Bundle savedInstanceState) { base.OnCreate(savedInstanceState); Xamarin.Essentials.Platform.Init(this, savedInstanceState); SetContentView(Resource.Layout.activity_main); Android.Support.V7.Widget.Toolbar toolbar = FindViewById<Android.Support.V7.Widget.Toolbar>(Resource.Id.toolbar); SetSupportActionBar(toolbar); FloatingActionButton fab = FindViewById<FloatingActionButton>(Resource.Id.fab); fab.Click += FabOnClick; } |
Where does Resource come from?
The Resource class is auto generated from the Resource.designer.cs class. All resources within the project can be referenced from code using the Resource class. Resource.Layout.activity_main refers to the layout file defined in the Resources -> layout -> activity_main.axml file.
Exploring the layout file
The layout file for the activity is found in the Resources -> layout -> activity_main.axml. The layout file is an xml file, although Xamarin.Android uses a different extension axml.
1 | <?xml version="1.0" encoding="utf-8"?>
|
The layout next defines the parent container for the views. The top level layout for the activity_main.axml is a CoordinatorLayout from the Material Design Support library.
What is a CoordinatorLayout
CoordinatorLayout - is a super-powered FrameLayout. CoordinatorLayout is intended for two primary use cases:
- As a top-level application decor or chrome layout
- As a container for a specific interaction with one or more child views
To implement the guidelines in the Material Design spec, the CoordinatorLayout is used a top level layout. The xml tags open and close. For parent layouts, we can insert views within the open and closing tags.
1 2 3 4 5 6 7 8 9 | <?xml version="1.0" encoding="utf-8"?> <android.support.design.widget.CoordinatorLayout xmlns:android="http://schemas.android.com/apk/res/android" xmlns:app="http://schemas.android.com/apk/res-auto" xmlns:tools="http://schemas.android.com/tools" android:layout_width="match_parent" android:layout_height="match_parent"> ... </android.support.design.widget.CoordinatorLayout> |
Defining the namespaces
Most views come from the http://schemas.android.com/apk/res/android namespace. Its defined using the xml attribute xmlns and called android. Also notice several namespaces are defined, the app and tools :
1 2 3 4 5 6 7 8 9 | <?xml version="1.0" encoding="utf-8"?> <android.support.design.widget.CoordinatorLayout xmlns:android="http://schemas.android.com/apk/res/android" xmlns:app="http://schemas.android.com/apk/res-auto" xmlns:tools="http://schemas.android.com/tools" android:layout_width="match_parent" android:layout_height="match_parent"> ... </android.support.design.widget.CoordinatorLayout> |
Once the namespace is defined, things like the width and height of the views can now be referred using the android namespace.
The namespace name could be anything
Its standard to call the http://schemas.android.com/apk/res/android namespace android but the name could be anything. We could have defined it as xmlns:demo="http://schemas.android.com/apk/res/android" and anywhere else later we would have to use demo as follows :
1 2 3 4 5 6 7 8 9 | <?xml version="1.0" encoding="utf-8"?> <android.support.design.widget.CoordinatorLayout xmlns:demo="http://schemas.android.com/apk/res/android" xmlns:app="http://schemas.android.com/apk/res-auto" xmlns:tools="http://schemas.android.com/tools" demo:layout_width="match_parent" demo:layout_height="match_parent"> ... </android.support.design.widget.CoordinatorLayout> |
Width and Height required attributes
Every view in Android needs to define the width and height. The CoordinatorLayout layout defines the width and height with the following android:layout_width="match_parent" and android:layout_height="match_parent" respectively.
View attributes
match_parent- Matches the view's width or height to that of the parentwrap_content- Matches the width or height or the view to match its contents, The view will stretch or shrink to match its contents
The CoordinatorLayout matches the phone's screen width and height by using the match_parent in both attributes.
1 2 3 4 5 6 7 8 9 | <?xml version="1.0" encoding="utf-8"?> <android.support.design.widget.CoordinatorLayout xmlns:android="http://schemas.android.com/apk/res/android" xmlns:app="http://schemas.android.com/apk/res-auto" xmlns:tools="http://schemas.android.com/tools" android:layout_width="match_parent" android:layout_height="match_parent"> ... </android.support.design.widget.CoordinatorLayout> |
AppBarLayout
The next view defined in the layout is the AppBarLayout. The AppBarLayout is a vertical LinearLayout which implements many of the features of material designs app bar concept, namely scrolling gestures. The AppBarLayout needs to be a direct child of the CoordinatorLayout as in the activity_main.axml file.
1 2 3 4 5 6 | <android.support.design.widget.AppBarLayout android:layout_width="match_parent" android:layout_height="wrap_content" android:theme="@style/AppTheme.AppBarOverlay"> ... </android.support.design.widget.AppBarLayout> |
Toolbar
The toolbar is defined using the Toolbar widget which comes from Android support library. The Toolbar also needs to be a direct descendant of the AppBarLayout to be scroll aware.
1 2 3 4 5 6 | <android.support.v7.widget.Toolbar android:id="@+id/toolbar" android:layout_width="match_parent" android:layout_height="?attr/actionBarSize" android:background="?attr/colorPrimary" app:popupTheme="@style/AppTheme.PopupOverlay" /> |
Main layout content
The main content is in separated layout file. To include the content layout in the activity_main.axml file, the include tag is used as follows :
1 | <include layout="@layout/content_main" /> |
The line above include the contents of the layout -> content_main at that point in the layout file.
The content_main defines a RelativeLayout as the parent layout with a TextView.
1 2 3 4 5 6 7 8 9 10 11 12 13 14 15 | <?xml version="1.0" encoding="utf-8"?> <RelativeLayout xmlns:android="http://schemas.android.com/apk/res/android" xmlns:app="http://schemas.android.com/apk/res-auto" xmlns:tools="http://schemas.android.com/tools" android:layout_width="match_parent" android:layout_height="match_parent" app:layout_behavior="@string/appbar_scrolling_view_behavior" tools:showIn="@layout/activity_main"> <TextView android:layout_width="wrap_content" android:layout_height="wrap_content" android:layout_centerInParent="true" android:text="Hello World!" /> </RelativeLayout> |
Lastly, the layout also include a FloatingActionButton which was added with the following code:
1 2 3 4 5 6 7 | <android.support.design.widget.FloatingActionButton android:id="@+id/fab" android:layout_width="wrap_content" android:layout_height="wrap_content" android:layout_gravity="bottom|end" android:layout_margin="@dimen/fab_margin" app:srcCompat="@android:drawable/ic_dialog_email" /> |
Summary
In this chapter we've explored the default Xamarin.Android created by Visual Studio 2019. The project have a specific layout, includes the AndroidManifest.xml file, the MainActivity.cs and its associated layout files defined in the Resources folder. We've also created an Android emulator to run and test our apps.
Exercise
- Using Visual Studio, create a new Xamarin.Android project.
- Add at least one view
- Run the project on the emulator
- Run the project on your physical Android phone