Android Dialogs and Pickers
Dialogs
A dialog is a window that appears on top of the display or fills the display, interrupting the flow of Activity. Dialogs inform users about a specific task and may contain critical information, require decisions, or involve multiple tasks.
The base class for all dialog components is a Dialog.
Pickers
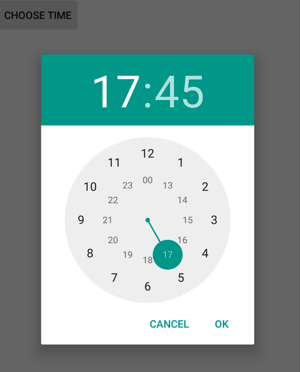
Pickers are ready to use dialogs that are provided by the Android framework. Android provides pickers for date and time. Each picker provides controls for selecting each part of the time (hour, minute, AM/PM) or date (month, day, year).
Using these pickers helps ensure that your users can pick a time or date that is valid, formatted correctly, and adjusted to the user's locale.

We recommend that you use DialogFragment to host each time or date picker. The DialogFragment manages the dialog life cycle for you and allows you to display the pickers in different layout configurations, such as in a basic dialog on handsets or as an embedded part of the layout on large screens.
Use pickers sparingly
Best practices recommend using dialogs sparingly as they interrupt the user's workflow. Read more on the Dialog guides
Dialog subclasses
You should not instantiate a dialog directly, instead use one of the subclasses of the Dialog class:
AlertDialog: A dialog that can show a title, up to three buttons, a list of selectable items, or a custom layout.DatePickerDialog: A dialog with a predefined UI that lets the user select a date.TimePickerDialog: A dialog with a predefined UI that lets the user select a time.
Alert dialogs
Alerts are urgent interruptions, requiring acknowledgement or action, that inform the user about a situation as it occurs, or an action before it occurs (as in discarding a draft). Use the AlertDialog subclass of the Dialog class to show a standard dialog for an alert. The AlertDialog class allows you to build a variety of dialog designs. An alert dialog can have the following regions (refer to the diagram below):

The figure above shows:
- Title: A title is optional. Most alerts don't need titles. Use a title if the situation is high-risk, such as the potential loss of connectivity or data, and the content area is occupied by a detailed message, a list, or custom layout.
- Content area: The content area can display a message, a list, or other custom layout.
- Action buttons: You should use no more than three action buttons in a dialog, and most have only two.
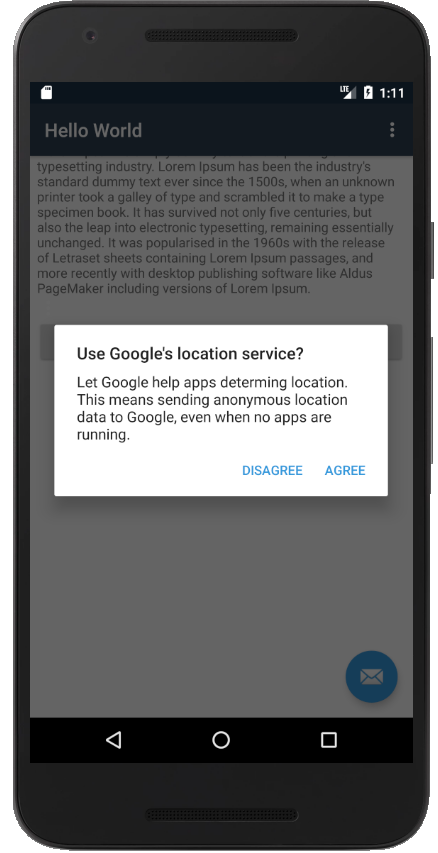
Creating the AlertDialog
To create the dialog, use the AlertDialog.Builder as follows:
1 2 3 4 5 6 7 8 9 10 11 12 13 14 15 16 17 | Android.Support.V7.App.AlertDialog.Builder builder = new Android.Support.V7.App.AlertDialog.Builder(this) // Set the title of the dialog .SetTitle("Use Google's location service?") //Set the content .SetMessage("Let Google help apps determing location. This means sending anonymous location data to Google, even when no apps are running.") // show and handle the positive button event .SetPositiveButton("Agree", (object s, Android.Content.DialogClickEventArgs dialogClickEventArgs) => { Log.Debug(TAG, $"{ dialogClickEventArgs.Which}"); // Handle positive button click event }) // Show and handle the negative button click event .SetNegativeButton("Disagree", (object s, Android.Content.DialogClickEventArgs dialogClickEventArgs) => { Log.Debug(TAG, $"{ dialogClickEventArgs.Which}"); // handle negative button click event }); |
Create the dialog
Create the dialog from the builder as follows:
1 | var dialog = builder.Create(); |
Show the dialog
Use the Show method to display the dialog
1 | dialog.Show(); |
The complete code should be as follows:
1 2 3 4 5 6 7 8 9 10 11 12 13 14 15 16 17 18 19 | void BtnShowAlert_Click(object sender, EventArgs e) { Android.Support.V7.App.AlertDialog.Builder builder = new Android.Support.V7.App.AlertDialog.Builder(this) .SetTitle("Use Google's location service?") .SetMessage("Let Google help apps determing location. This means sending anonymous location data to Google, even when no apps are running.") .SetPositiveButton("Agree", (object s, Android.Content.DialogClickEventArgs dialogClickEventArgs) => { Log.Debug(TAG, $"{ dialogClickEventArgs.Which}"); // Handle positive button click event }) .SetNegativeButton("Disagree", (object s, Android.Content.DialogClickEventArgs dialogClickEventArgs) => { Log.Debug(TAG, $"{ dialogClickEventArgs.Which}"); // handle negative button click event }); var dialog = builder.Create(); dialog.Show(); } |
The above method is handling the click event of a view. You should see a a screen as below:
Which AlertDialog class
There are several AlertDialog classes. You should use the support version of the dialog class as we have done above. Either use the fully qualified name Android.Support.V7.App.AlertDialog or add a using statement at the top of the class.
Date Picker Dialog
They are two ways of picking a date:
- Use the
DatePickerview control - Use a DatePickerDialog.
Which method is preferred
Using the DatePickerDialog is the preferred way as the dialog will render differently on mobile and tablets.
Using a DialogFragment
The DatePickerDialog needs fragment to host it and we use the DialogFragment. Use the DialogFragment from the support library to support older devices.
Define a fragment that inherits from the AppCompatDialogFragment.
1 2 3 4 5 6 7 8 9 10 11 12 13 | class DatePickerFragment : AppCompatDialogFragment { //This event will be invoked when we set the date public event EventHandler<DatePickerDialog.DateSetEventArgs> DateSet = delegate { }; //Override the constructor and create a DatePickerDialog using the current date public override Dialog OnCreateDialog(Bundle savedInstanceState) { return new DatePickerDialog(Context, (sender, e) => { //Invoke the event, once the date have been set DateSet(sender, e); }, DateTime.Now.Year, DateTime.Now.Month, DateTime.Now.Day); } } |
Show the Date Picker
We can attach an event to the button and instantiate the fragment and then show it.
1 2 3 4 5 6 7 8 9 10 11 12 13 14 15 | // Get our button from the layout resource, // and attach an event to it Button button = FindViewById<Button>(Resource.Id.myButton); button.Click += delegate { var datePicker = new DatePickerFragment(); //Attach an event to the fragment datePicker.DateSet += (sender, e) => { //Show the date on the console Console.WriteLine(e.Date); }; //Show the date picker //Needs a Support Fragment managing the lifecycle of the fragment datePicker.Show(SupportFragmentManager, "datepicker"); }; |
Time Picker Dialog

The procedure is the same as setting the date, we need to host the TimerPickerDialog in a DialogFragment.
1 2 3 4 5 6 7 8 9 10 11 12 13 | class TimePickerFragment : AppCompatDialogFragment { //This event will be invoked when we set the date public event EventHandler<TimePickerDialog.TimeSetEventArgs> TimeSet = delegate { }; //Ovverrice the constructor and create a DatePickerDialog using the current date public override Dialog OnCreateDialog(Bundle savedInstanceState) { return new TimePickerDialog(Context, (sender, e) => { TimeSet(sender, e); }, DateTime.Now.Hour, DateTime.Now.Minute, true); } } |
Hook event to button
We can then hook an event to the button to display the timer picker fragment.
1 2 3 4 5 6 7 8 9 10 11 12 13 14 15 | // Get our button from the layout resource, // and attach an event to it Button button = FindViewById<Button>(Resource.Id.myButton); button.Click += delegate { var timePicker = new TimePickerFragment(); //Attach an event to the fragment timePicker.TimeSet += (sender, e) => { //Show the date on the console Console.WriteLine($"{e.HourOfDay}:{e.Minute}"); }; //Show the date picker //Needs a Support Fragment managing the lifecycle of the fragment timePicker.Show(SupportFragmentManager, "timepicker"); }; |
Creating Picker in API Level 24
Using API 24, you can create the DatePickerDialog without having to create a subclass of the DialogFragment as follows:
1 2 3 4 5 6 7 8 9 10 | // Create the dialog DatePickerDialog datePickerDialog = new DatePickerDialog(this); // Handle the date selected event datePickerDialog.DateSet += (object sender, DatePickerDialog.DateSetEventArgs e) => { Log.Debug(TAG, e.Date.ToString()); }; //Show the dialog datePickerDialog.Show(); |
We can also similarly show the time picker dialog as follows:
1 2 3 4 5 | // Instantiate the dialog and handle the time selected event TimePickerDialog timePickerDialog = new TimePickerDialog(this, (s, evt) => { }, 12, 59, true); // Show the dialog timePickerDialog.Show(); |
Custom Dialog
We can use the AlertDialog and instead of using a simple message, we use a custom layout to set its contents.